Battery switch on travel trailer function is crucial for managing your RV’s power. Understanding how your battery switch works is key to avoiding dead batteries and electrical problems. This guide will walk you through the different types of switches, safe operating procedures, troubleshooting tips, and essential maintenance to keep your travel trailer running smoothly. We’ll cover everything from basic functionality to advanced power management techniques, ensuring you’re confident in handling your RV’s electrical system.
We’ll explore various battery switch types, their wiring, and how to safely connect and disconnect your batteries. We’ll also delve into troubleshooting common issues, such as blown fuses and faulty switches, and provide practical tips for extending your battery life. By the end, you’ll be equipped to maintain your travel trailer’s electrical system efficiently and safely.
Understanding Battery Switch Functionality in Travel Trailers: Battery Switch On Travel Trailer Function
Your travel trailer’s battery switch is a crucial component, acting as the central control for your trailer’s battery power. It allows you to disconnect your batteries from the trailer’s electrical system, preventing drain and protecting your sensitive electronics. Understanding how it works is essential for maintaining your RV and preventing costly repairs.
Battery Switch Types
Travel trailers utilize various battery switch types, each with its own advantages and disadvantages. The most common are single, dual, and multi-battery switches. A single battery switch controls one battery, typically used for smaller trailers. Dual battery switches control two batteries, allowing for separate management of house and starting batteries (common in larger trailers). Multi-battery switches, though less common, can manage more than two batteries for more complex power setups.
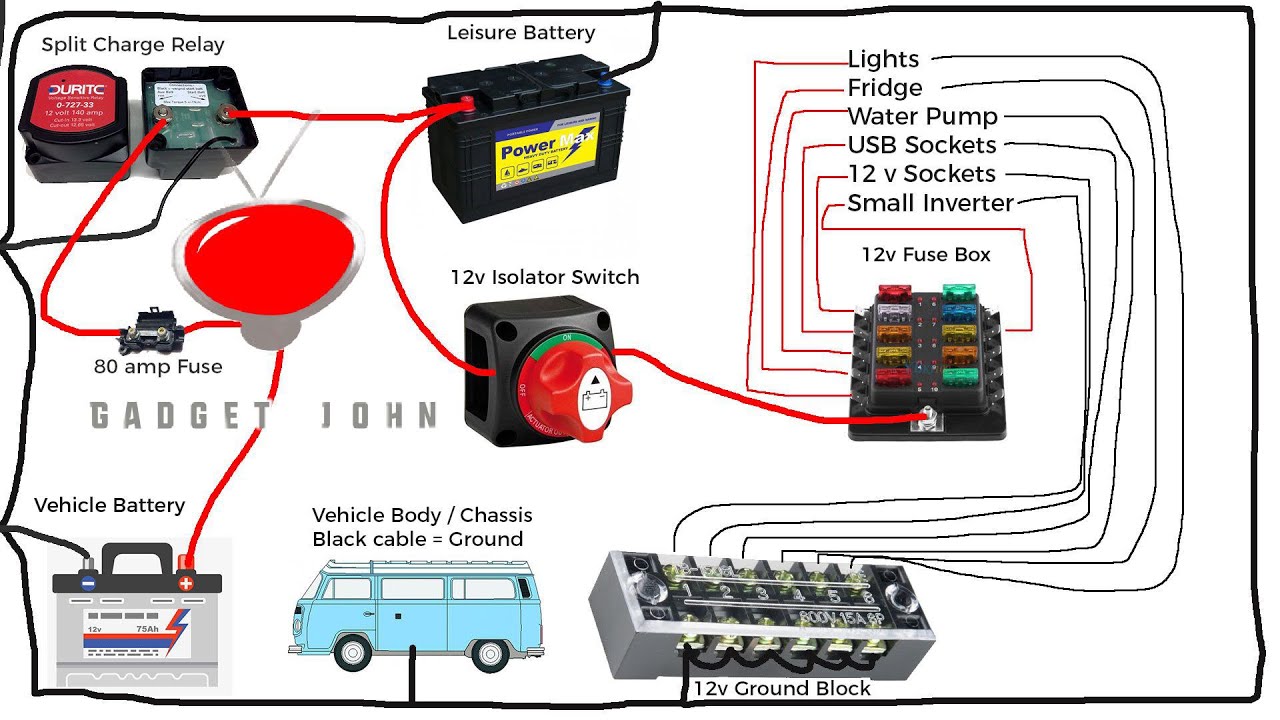
Typical Wiring Diagram for a Battery Switch System
A typical dual-battery system involves two batteries connected to a dual battery switch. The switch then connects to the trailer’s 12V system, powering appliances and lights. One battery might be dedicated to house functions (lights, appliances), while the other powers the trailer’s tongue jack and other starting functions. The switch allows you to isolate either battery, both batteries, or connect both to the trailer’s system.
A properly wired system will also include a fuse or circuit breaker for added protection. Imagine a diagram where two batteries are shown, each with a positive and negative terminal. Lines representing wires connect the positive terminals to the input terminals of the dual battery switch. From the switch, another wire runs to the positive bus bar of the trailer’s 12V system.
Negative terminals of the batteries are connected directly to the negative bus bar, completing the circuit.
Comparison of Battery Switch Types
| Feature | Single Battery Switch | Dual Battery Switch | Multi-Battery Switch |
|---|---|---|---|
| Number of Batteries Controlled | One | Two | Three or more |
| Typical Use Cases | Small travel trailers | Larger travel trailers with separate house and starting batteries | Complex setups with multiple battery banks |
| Complexity | Simple | Moderate | High |
| Cost | Low | Medium | High |
Operating the Battery Switch
Safe and proper operation of your travel trailer’s battery switch is crucial for preventing electrical issues and ensuring the longevity of your batteries. Understanding the procedure and following best practices will help avoid problems and keep your RV running smoothly.This section details the step-by-step process for safely operating your battery switch, along with important safety precautions and preventative maintenance tips.
Remember to always consult your specific travel trailer’s manual for detailed instructions related to your model.
So, you’re prepping for your awesome RV trip? First things first: understand your travel trailer’s power. Knowing how to use the battery switch on travel trailer function is crucial for keeping your lights and appliances running. Then, make sure you’re covered with good travel insurance. Check out Aon travel insurance for options; it’s always smart to be prepared for the unexpected on the road!
Safe Battery Switch Operation Procedure
Before working with your battery switch, always ensure you’ve turned off all power to your trailer. This prevents accidental shorts or shocks. The following steps Artikel the correct procedure for both connecting and disconnecting your batteries:
- Locate the Battery Switch: Typically found near the battery or inside a compartment easily accessible from the outside of your trailer.
- Identify Switch Positions: Most switches have three positions: “Off,” “Battery,” and “Both.” “Off” completely disconnects the batteries. “Battery” connects only the trailer’s house battery. “Both” connects both the house battery and the starting battery (for your tow vehicle’s connection).
- Turn the Switch to “Off”: Before connecting or disconnecting anything, always start with the switch in the “Off” position. This ensures a safe working environment.
- Connecting the Batteries: To connect, carefully turn the switch to either “Battery” (for house battery only) or “Both” (for both house and starting batteries), depending on your needs.
- Disconnecting the Batteries: To disconnect, simply turn the switch to the “Off” position. This will completely isolate the batteries from the trailer’s electrical system.
Preventing Common Battery Switch Problems
Regular inspection and maintenance of your battery switch and connections can prevent many common problems. Neglecting these can lead to corrosion, poor connections, and even battery damage.
- Inspect Connections Regularly: Check for corrosion, loose connections, or damaged wires at least twice a year, or more often if you frequently use your trailer in wet or humid conditions. Clean any corrosion with a wire brush and baking soda paste.
- Tighten Connections: Ensure all connections are securely tightened. Loose connections can create resistance and lead to overheating.
- Use Protective Coatings: Applying a dielectric grease to terminals helps prevent corrosion and ensures a good electrical connection.
- Address Corrosion Promptly: Don’t ignore corrosion. The longer you wait, the more damage it can cause.
Importance of Disconnecting Batteries When Not in Use
Disconnecting your batteries when your travel trailer is not in use is crucial for several reasons. Parasitic draws, even small ones, can slowly drain your batteries over time, leading to a dead battery when you’re ready to use your trailer again.
Disconnecting your batteries prevents potentially costly repairs caused by drained batteries and related electrical problems.
Visual Guide: Connecting and Disconnecting the Battery
The visual guide would depict a three-position battery switch with clear labels for “Off,” “Battery,” and “Both.” Arrows would illustrate the direction of the switch handle for each operation. A separate section would show a close-up of the battery terminals, highlighting the importance of clean, tight connections and the application of dielectric grease. The image would emphasize the need to always turn the switch to “Off” before performing any connection or disconnection.
The visual would also depict the location of the battery switch (usually clearly labeled) and possibly include a warning about electrical safety.
Troubleshooting Common Battery Switch Issues

Your travel trailer’s battery switch is a crucial component, and problems can leave you stranded. Understanding common issues and how to diagnose them is key to maintaining power on the road. This section will guide you through identifying and resolving some of the most frequent problems.
So, you’re gearing up for that epic road trip in your travel trailer? Awesome! First things first: make sure you understand your battery switch on travel trailer function – it’s crucial for keeping your lights and appliances running. Knowing how to properly use it will save you headaches down the road. And speaking of trips, don’t forget travel insurance! Grab a policy from Aon travel insurance for peace of mind – you’ll be glad you did if anything unexpected happens.
Dead Battery
A dead battery is the most common issue. This can stem from various sources, including leaving lights on, parasitic draws from appliances, or simply a battery reaching the end of its lifespan. Diagnosing a dead battery is relatively straightforward. First, check the battery voltage using a multimeter. A reading significantly below 12.6 volts (for a 12-volt battery) indicates a low charge.
If the voltage is low, attempt charging the battery with a suitable charger. If the battery still doesn’t hold a charge after charging, it likely needs replacement.
Blown Fuse
A blown fuse indicates an overload in the electrical system. This could be caused by a short circuit, connecting too many high-draw appliances simultaneously, or a malfunctioning appliance. Inspect the fuse box located near the battery switch. Look for a blown fuse—it will usually show a broken filament or a burned appearance. Replace the blown fuse with a fuse of the same amperage rating.
If the new fuse blows immediately, you have a short circuit that needs immediate attention. A qualified electrician should address this problem.
Faulty Battery Switch, Battery switch on travel trailer function
A malfunctioning battery switch can prevent power from reaching your trailer’s batteries or appliances. Symptoms might include no power to appliances even with a fully charged battery or inconsistent power. To test the switch, you can use a multimeter to check for continuity between the terminals. If there’s no continuity when the switch is in the “on” position, the switch is likely faulty and needs replacing.
If the switch feels unusually hot or emits an unusual smell, this is also a strong indicator of a problem.
Troubleshooting Flowchart
A simple flowchart can streamline the troubleshooting process:
| Problem | Diagnosis | Solution |
|---|---|---|
| No Power to Appliances | Check battery voltage. Check fuses. Check battery switch continuity. | Charge battery, replace blown fuse, replace faulty switch. |
| Battery Drains Quickly | Check for parasitic draws (leaving lights on, etc.). Test battery health. | Address parasitic draws, replace weak battery. |
| Intermittent Power | Inspect wiring connections. Check battery switch. | Tighten loose connections, replace faulty switch. |
Replacing a Faulty Battery Switch or Fuse
Replacing a blown fuse is usually straightforward. Simply remove the blown fuse and replace it with a new one of the same amperage rating. Remember to disconnect the battery’s negative terminal before working with the fuse box for safety. Replacing a battery switch is more complex and might require some electrical knowledge. It involves disconnecting the wiring harness, removing the old switch, and installing the new switch, ensuring proper wiring connections.
Consult your trailer’s wiring diagram and if unsure, seek professional help. Always disconnect the battery’s negative terminal before any electrical work. Incorrect wiring can cause serious damage or injury.
Battery Switch and its Relationship to other Trailer Systems
Your battery switch is the central control for your travel trailer’s DC power. Understanding how it interacts with your lights, appliances, and other systems is crucial for safe and efficient operation. This section will clarify the power flow and help you manage your energy resources effectively.The battery switch acts as a gatekeeper, determining which power source (your trailer batteries or shore power) feeds the 12-volt DC systems in your RV.
When the switch is in the “off” position, all DC power to the trailer is cut, preventing accidental drain on your batteries. In the “battery” position, power flows solely from your trailer batteries. The “both” or “combined” position (if your switch has it) allows power from both your batteries and shore power to feed the system. This can be helpful for charging batteries while simultaneously running appliances.
Crucially, remember that even with the switch in the “off” position, some systems might still draw minimal power (e.g., a low-power carbon monoxide detector).
Power Draw of Appliances and Impact on Battery Life
Different appliances consume varying amounts of power. For instance, a small LED interior light draws significantly less power than an air conditioner or a microwave. Running a high-power appliance for an extended period will deplete your batteries much faster than using low-power devices. A typical RV refrigerator, for example, might draw between 3 and 10 amps, while a microwave could pull 10 amps or more.
This means the microwave will drain your battery faster. Understanding these power demands allows you to make informed decisions about energy consumption. For instance, if you are boondocking (off-grid camping), you’ll want to prioritize lower-power appliances to extend your battery life.
Managing Power Consumption to Extend Battery Life
Effective power management is essential for maximizing your battery life, especially when off-grid. Prioritizing energy-efficient appliances and minimizing unnecessary power usage are key strategies. Consider the following:
- Use LED lighting instead of incandescent bulbs. LEDs use significantly less power and last much longer.
- Turn off lights and appliances when not in use. This may seem obvious, but it’s easy to forget.
- Minimize use of high-power appliances like air conditioners and microwaves, especially when off-grid. Consider alternatives, like using a camp stove for cooking.
- Use a power meter to monitor your energy consumption. This provides valuable data for making informed decisions about appliance usage.
- Keep your refrigerator and freezer well-insulated to reduce the energy required to maintain temperature.
Energy-Saving Tips for Travel Trailers
The following tips offer practical strategies to conserve energy and extend your battery life:
- Invest in energy-efficient appliances: Look for appliances with low power consumption ratings.
- Use a solar panel system: Solar panels can supplement your battery power, reducing reliance on your onboard batteries.
- Utilize shore power whenever possible: Hooking up to shore power eliminates the need to run entirely off batteries.
- Plan your activities around peak sun hours: Use high-power appliances during daylight hours when your solar panels (if you have them) are producing the most power.
- Unplug unused devices and chargers: Even when turned off, many devices still draw a small amount of “phantom” power.
Mastering your travel trailer’s battery switch is more than just flipping a switch; it’s about understanding your RV’s power system and ensuring safe and reliable operation. By following the tips and troubleshooting advice Artikeld here, you can prevent costly repairs, extend the life of your batteries, and enjoy worry-free adventures. Remember regular maintenance and safe operating practices are your best bet for a happy and powerful travel experience!
Commonly Asked Questions
What happens if I leave my battery switch on all the time?
Leaving your battery switch on constantly can drain your batteries, especially if you have parasitic draws (small electrical loads even when appliances are off). This can lead to a dead battery and prevent your trailer from starting.
How do I know if my battery switch is bad?
Symptoms of a bad battery switch include no power to appliances even with fully charged batteries, inconsistent power, or a switch that feels loose or doesn’t click properly. Check fuses first before assuming the switch is at fault.
Can I use a different type of battery switch in my travel trailer?
Replacing your battery switch with a different type might require rewiring. It’s best to consult a qualified RV technician or refer to your trailer’s wiring diagram to ensure compatibility and safety.
How often should I clean my battery terminals?
Clean your battery terminals at least twice a year, or more frequently if you notice corrosion. Use a wire brush and baking soda solution to clean them thoroughly.
